Wednesday, December 21, 2011

Lightened-Up Broccoli-Cheese Soup


Oh The Pioneer Woman. Her recipes kill me. One because they are so tasty, and another because they are not always the lightest. Most of the time, I just go all out for it and make it. But I've been really trying to eat healthier and not indulge too much lately (or so I say until you see one of my next posts...).

Well, I decided that I wanted some warm and creamy soup, but I wanted to lighten it up a bit. So that I did. And guess what? It tasted great! I was so proud of myself. Not to mention I decided that I wanted to make it in a bread bowl. Not just any bread bowl, but pretzel rolls from Trader Joe's. Yummy! John loved it, and we enjoyed our leftovers (eating some now!).

So go ahead and indulge a bit. I won't tell anyone. ;)

Lightened-Up Broccoli-Cheese Soup
Recipe by Call Me Mrs. Rapp; Adapated from The Pioneer Woman
Serves 4-6, depending on portions
Pin It
Ingredients: 
*1/2 onion, diced
*2 tbsp. butter
*2 tbsp. plus 2 tsp. flour 
*2 cups milk (I used 2%)
*1 cup half-and-half 
*2 heads broccoli, cut into florets 
*1 pinch nutmeg 
*1 1/2 cups grated cheese (I used sharp cheddar & white cheddar) 
*small dash of salt (more if needed) 
*pepper
*splash of chicken broth, if needed for thinning

Preparation:

*Melt butter in a pot over medium heat, then add the onions. Cook the onions for 3 to 4 minutes.

*Sprinkle flour on top. Stir to combine and cook for 1 minute or so, then pour in milk and half-and-half.

*Add nutmeg, then add broccoli, a small dash of salt, and plenty of black pepper.

*Cover and reduce heat to low. Simmer for 20 to 30 minutes, or until the broccoli is tender.

*Stir in cheese and allow to melt.

*Taste seasonings and adjust if needed.

Then either serve as is, or mash it with a potato masher to break up the broccoli a bit, or transfer to a blender in two batches and puree completely. (If you puree it in a blender, return it to the heat and allow to heat up. Splash in chicken broth if needed for thinning).

If you serve it in a bread bowl or pretzel roll, just scoop out the insides (not too much or it will leak!) and pour! You can also throw it in the oven under the broiler to make it a little bit firmer and toasted. I just left it as is. 
Prep time: diced onion, broccoli, and cheddar

onion, butter and flour

Plus milk, half and half, broccoli and spices...note how much broccoli is actually in there

After cooking for about 20 minutes it's time for cheese! (and broccoli cooked down!)

Trader Joe's pretzel roll

soup in the pretzel roll!

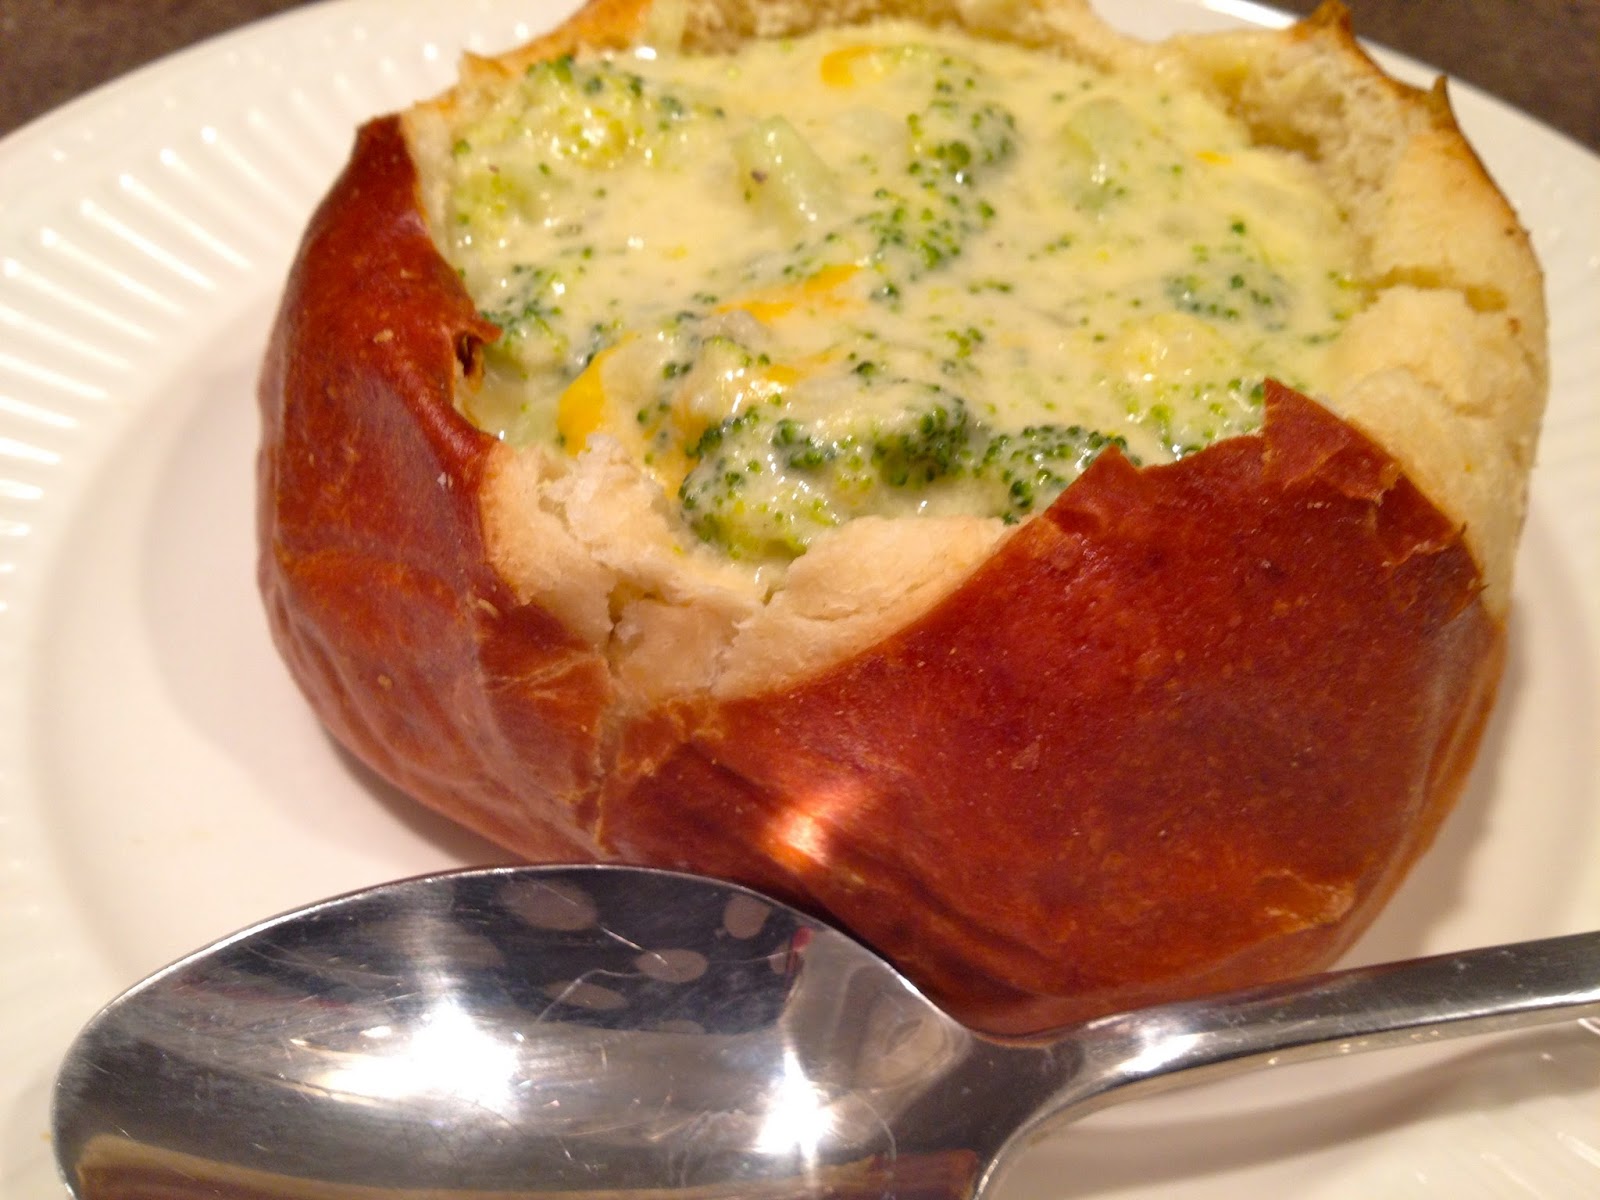
sooo yummy! take that Panera!


Thursday, December 15, 2011

Winter Decor: Table Spread


Me again, with more decor ideas! After publishing my last post, Christmas Decor: Garland and More!, I realized that I wasn't too crazy about the pictures. I may have to try to take a few more tonight and republish them. Unfortunately I'm working with my iPhone camera only because our camera is on the fritz.

This time I wanted to share our dining room table spread, to maybe give you some ideas as to how to decorate your own dining room/kitchen tables! I'm going to preface this by saying that all the very nice pieces are wedding gifts. All the non-expensive pieces were bought by me. I stick to my decorating budget! Wal-mart, Target, CVS, HomeGoods, Crate and Barrel...all some of my best friends when it comes to decorating for less.

I've included links to the items I could find online, or at least told you where you can buy these, in case you are interested. Happy holidays!

Layout for Dining Room Table, Winter Season!

What I used:
*Waterford Lismore Crystal 8" Candlestick Pair (Bed, Bath & Beyond)
*Tiffany Curved Candlestick in Crystal (Tiffany)
*Tiffany Vase (Tiffany, could not find it online)
*All fillings mentioned in this post for this floral arrangement
*Antique Glass Small Gold Candle holder (Crate and Barrel)
*Waterford Lismore Crystal Salt and Pepper Shakers (Bed, Bath & Beyond)
*Waterford Lismore Crystal Covered Butter Dish (Bed, Bath & Beyond)
*Red Taper Candles (Wal-mart, not available online)
*Gold Taper Candles (Crate and Barrel, no longer available online)


Christmas Decor: Garland and More!


The other day I was looking at the heading of my blog. You know how it says my favorite recipes, dishes and decor ideas? Well I realized I don't actually include decor ideas too often. In fact I've had floral centerpiece posts white, yellow, red and festive...and that's about it.

Cue need for some decor ideas! I've decided to share a few of the decorations and spreads I've done in our house, and I tried to say where I got each item, how much it was, and include the website link if applicable.

If I'm feeling extra festive I'll even post a few more posts about this. Better late than never, right?

Festive Garland for Media Console, Stand or Other Similar Space

What I used:
*1 14-foot garland, with lights (CVS, not available online, less than $10 when I purchased)
*Several individual three-berry holly leaves (HomeGoods, not available online, $5 pack of 20)
*2 Metallic Gold Ball Candles (Crate and Barrel, $8.95 each)
*1 Snowflake Ball Candle (Crate and Barrel, $8.95)
*2 Tree Candles (Crate and Barrel, Set of Four, $8.95)
*1 Lenox Wedding Promises First Dance Cake Topper (Bed, Bath & Beyond, $79.99)
*1 Personalized Name frame (Not sure, it was a wedding gift!)

How I put it all together:
I started by laying out the garland on the media console. We always have the personalized frame and cake topper out, so those just stayed where they were. Next I put the gold candles in place, symmetrical of course (I am such a spaz about this). I added the snowflake candle in the middle, since I only bought one. I then put the little pine trees between the gold candles and snowflake candle, again, for symmetry! Finally I used the red holly to festive it up a bit more and add some warmth and color.

Photo with flash...note The Grinch is on in the background!

Photo without flash...look at the nice lighting it gives :)
Metallic Gold Ball Candles, Decorative Holly pieces, Lenox Wedding Promises First Dance Cake Topper

Holly, Tree Candles

Snowflake Ball Candle

Holly, Metallic Gold Ball Candles, Personalized frame


Tuesday, December 13, 2011

Chicken Cordon Bleu with Prosciutto & Goat Cheese


Growing up I had my fair share of chicken cordon bleu, usually from those food order catalogues from school. My mom didn't buy them too often but when she did I was a pretty big fan of them. Fast forward to now...I don't remember the last time I ate chicken cordon bleu. I guess not having those catalogues means not having the chicken!

Anyhoo, a few weeks back I won a giveaway from one of my favorite blogs Peanut Butter Fingers. Julie chronicles her healthy living and posts her workouts, meals, recipes, and fun anecdotes from her day, especially those involving her sweet dog Sadie.

As part of the giveaway I won 5 gift cards for free Chavrie goat cheese and goodies from Crate and Barrel (dessert stand, measuring cups, measuring spoons and ceramic mixing bowls), score! I also received a goat cheese cookbook from Chavrie.

Would you guess what was in the cookbook? Chavrie Chicken Cordon Bleu! I was inspired to mix up the recipe a bit (and lighten it up a bit, too), and out came this delicious dish! Creamy and full of flavor. It was perfect because I haven't cooked standard chicken breasts in awhile. John was thrilled and thought it was super tasty. He wolfed his down faster than me, which is saying a lot considering I eat so fast after a workout and cooking!

This dish reminded me a lot of Chicken Piccata, in terms of preparation and consistency of the chicken. If you liked that, you will love this. Try this spin on a classic dish and let me know what you think!

Chicken Cordon Bleu with Prosciutto & Goat Cheese
Recipe by Call Me Mrs. Rapp, inspired by Chavrie Chicken Cordon Bleu
Yields 2 finished chicken breasts
Pin It  

Ingredients:
*2 chicken breasts
*2 slices prosciutto
*2 oz goat cheese (I used the tasty Chavrie! and 2 oz was half the 4 oz log - - original recipe called for 4 oz for two people which I thought was a bit much)
*1/2 cup flour
*1 egg, beaten
*1 tbsp milk (I used skim)
*1 cup bread crumbs (I used 1/2 cup panko and 1/2 cup italian seasoned)
*2 tbsp. olive oil (original recipe called for 2 cups vegetable oil)
*salt and pepper

Preparation:
*Preheat oven to 350 degrees. Heat olive oil in a large skillet over medium-high heat.

*Place chicken breasts on a cutting board and cut a slit about 3/4 of the way through (horizontally), being careful not to cut completely through. *See pictures below if you are confused!

*Season each breast with salt and pepper.

*Cut 2 oz of goat cheese in half. Wrap each slice with prosciutto. Place each wrapped piece into chicken breast pocket. Press chicken breast firmly together to seal.

*Arrange a dipping station: 1 bowl with flour; 1 bowl with egg and milk; 1 bowl with bread crumbs. Dredge each breast through flour, egg mixture and bread crumbs before placing onto skillet with heated oil.

*Cook and pan fry until golden brown, about 2 to 3 minutes per side.

*Transfer to a sheet pan and place in oven to continue cooking, about 7-10 minutes, depending on the size of your chicken breasts.

*Split each chicken breast in half and serve. I served mine with Parmesan-Roasted Cauliflower.

Loving my free cheese! (Although in all honesty I would definitely buy it, too)

Roll 'em up, roll 'em down...(no really just roll it up)

One stuffed and another ready to go! My chicken breasts were itty bitty so I was nervous they wouldn't fit!

My station with the Chavrie For the Love of Goat Cheese cookbook for inspiration

Sizzle!

Creamy, cheesy goodness

the Italian seasoned bread crumbs also added some nice flavor

Scooping up some of that goat cheese!

Monday, December 12, 2011

Parmesan-Roasted Cauliflower


For any of you that follow me on facebook or twitter (@lbrapp), you may know that I've been spending time recently going through all those amazing cookbooks John and I got for our wedding. As such, lots of the recipes I'm cooking this week come from them. If you like a lot of the recipes then I suggest you get the cookbook. Really all of the ones we were given are terrific, and I need to take advantage of them more often.

This recipe is courtey of Barefoot Contessa at Home. It's been awhile since I've whipped up some of her recipes! (Buttermilk Mashed Potatoes, Lemon Garlic Roast Chicken, Mustard-Roasted Potatoes and Chicken Piccata are all hers and are delicious.)

This is a great, easy way to make veggies super yummy. Roasting the cauliflower makes it sweeter and makes the texture softer. Sprinkling some cheese on top and you have a delicious side dish! I halved the amount of cheese to make it a little healthier. I served this with Prosciutto-Wrapped Pork Tenderloin.

Parmesan-Roasted Cauliflower
Recipe by Barefoot Contessa At Home
Serves 4, depending on portions 
Pin It
Ingredients:
*1 large head of cauliflower
*3 tablespoons olive oil
*salt and pepper
*1/2 cup freshly grated Parmesan cheese (original recipe called for 1 cup)
*1/2 cup freshly grated Gruyere cheese (original recipe called for 1 cup)

Preparation:
*Preheat oven to 350 degrees.

*Remove the outer green leaves from the cauliflower and cut the head into florets, discarding the stems.

*Place florets on a sheet pan. Drizzle with olive oil and sprinkle generously with salt and pepper. Toss well.

*Bake for 30 minutes, tossing once, until the cauliflower is tender and starts to brown.

*Sprinkle with the Parmesan and Gruyere and bake for 1 to 2 more minutes, just until the cheese melts. Season to taste and serve hot or warm.  

Chopped, oiled and ready!

Done roasting

Add cheese...


A few minutes later and voila!

Yummy!

Friday, December 9, 2011

How To: Make the Most of Your Tube Makeup


Hey there! The other day I realized that I could no longer get any more concealer out of my little tube. But I knew there was still some in there because I could see it! Fortunately I learned a little trick in high school - when I was trying to prolong the life of my favorite Clinique lip glosses - and I used it to get at least another 2 weeks out of my makeup.

And now I'm sharing this little trick with you in case you weren't as motivated to savor your favorite pink lip gloss once upon a time...

The trick? Removing an extra tube inside the tube, which cleans off the wand and prevents you from having a waterfall of makeup every time you pull the wand out. You may have never noticed it was there, but now that you do you can follow the steps below to get some more of that makeup!

One final note...do not do this trick unless you are sure you can't get any more makeup out. If you do it too early (as I've done) you'll have a mess of a wand and a gooey lid.

How To: Make the Most of Your Tube Makeup
Pin It
*Grab a small object with a sharp tip or pointer (I have used tweezers, safety pins, sewing needles, etc.). The important part is that it is sharp and small.

*Look closely at your tube of makeup. If you look at the top carefully, you should see some plastic. You want to use your sharp object to pierce it as close to the actual tube as possible.

*Once pierced, carefully lift up to pull out this additional tube. If you pull too hard you will just rip the tube and will have to try again from a different part of the inner tube.

*When you pull it out you will be able to use your wand to get all the makeup/lipgloss out of the sides and top of your tube!

I tried to do the best with pictures, but I already used this trick before I even thought of making a post about it. Feel free to send me an email or leave me a comment if you have questions!

Using the tweezers to pull out the tube (you can see where it tore because I didn't pull gently at first).

Closer look

Out!

Ta-da! More makeup :)

Thursday, December 8, 2011

Gnocchi Mac 'n Cheese


This is another fun recipe courtesy of my good friend Katie. I've encouraged you to go to her blog many times, so if you haven't by now you're really missing out. Katie and I met when we taught 2nd grade at an inner city charter school in Chicago. The school was difficult, and I was so grateful when Katie started working there and we developed our friendship. Even though we don't live in the same city anymore, I know she's a friend I will always keep in touch with.

Now part of this recipe calls for Gruyere cheese, which I thought I had. Turns out, I didn't. I decided to double the white cheddar and add some creamy goat cheese. Let me tell you, the goat cheese totally made this dish. I tried the sauce before I added it, and I thought it was good, but not great. However, once I added that goat cheese (I used Chavrie brand), it transformed into creamy goodness. I highly suggest you use it when making this.

Overall this was an easy dish. About 10 minutes of prep/work time and the rest was spent with the dish in the oven. Gnocchi cooks amazingly fast, and besides a few minutes of whisking the cheese (and grating it - thanks John!) this was fast and so simple. Also, John loved this. He yelled "awesome" several times, and loved how interesting and tasty it was. He said the gnocchi melted in his mouth (I agree) and overall it was perfect as the weather gets chillier. Yum!

Gnocchi Mac 'n Cheese
Recipe adapted from Katie, which was adapted from The Cutting Edge of Ordinary
Serves 2-4, depending on portions
Pin It
Ingredients:
*1 pound (average package) gnocchi (I used whole wheat gnocchi)
*2 tablespoons butter
*2 teaspoons garlic, finely chopped
*1 tablespoon flour
*3/4 cup milk (I used skim)
*1 teaspoon Dijon mustard
*1/4 cup shredded Gruyere cheese
*1/4 cup shredded cheddar cheese, mixed with the Gruyere cheese (I didn't have any Gruyere so I used 1/2 cup white cheddar)
*1 tbsp. (or more!) of goat cheese (I used Chavrie) This was my addition and it was fabulous!
*salt and pepper to taste
*1/3 cup shredded Parmesan

Preparation:
*Preheat oven to 375 and spray a baking or casserole dish with nonstick spray.

*Prepare the gnocchi according to the package directions. Drain well, and place as one layer in whatever dish you're using.

*Melt the butter in a saucepan over medium heat. As soon as it is all melted, add in your garlic. Whisk continuously for about 30 seconds, or until the garlic starts smelling really good.

*Whisk in the flour, and continue whisking until it thickens and bubbles.

*Then whisk in the milk and the Dijon. Continue whisking occasionally for about 3-5 minutes--the sauce should be thickening at that point.

*While you are whisking, start adding clumps of your cheese mixture into the sauce. Every time it is fully melted into the sauce (while whisking, naturally), add another handful until you've gone through all your cheese. Add the goat cheese and allow to make it so much creamier. I ended up adding about another tablespoon to my sauce because it tasted so good. 

*Season the sauce with salt and pepper to taste, then pour it over the gnocchi. Don't worry if it doesn't evenly coat. It may look like you don't have enough sauce, but trust me, it's fine.

*Sprinkle the top with Parmesan cheese, then bake for about 25 minutes, or until it's all nice and bubbly and golden.

*Let stand for about 5 minutes before serving.

garlic and butter
cheese is done!
in the oven - literally!
fresh out...look at that cheese
close up
one bowl...sorry for blurry picture
seconds anyone?
Related Posts Plugin for WordPress, Blogger...